

ON-THE-JOB: REPAIRING A WATER LEAK
Step 1: Pressure Test
Leak Locator’s repair process starts with pressurizing each of the underground plumbing lines to determine if there is a break in one of the lines. Also, Leak Locators uses state-of-the-art equipment to accurately pin-point the leak within 3 feet of the exact location.
Step 2: The Probe Test
Leak Locators drills a small hole and uses a probing rod to determine the location of the leak underground.


Step 3: Cut Concrete
Leak Locators traces a 2×2 foot square on the pool deck in the area of the underground leak. Then Leak Locators cuts the concrete out along a measured square.
Step 4: Removing Concrete
Leak Locators removes all the pieces of sliced concrete so that they can dig to the depth of the leak. All removed concrete is taken off the job site.


Step 5: Exposing The Pipe
Leak Locators digs to reach the depth of the pipe to expose the broken pipe. The removed dirt will be kept on-site as it will be used in a later step.
Step 6: Removing The Broken Pipe
Leak Locators clears out dirt and debris so there is room to work around the exposed pipe. Leak Locators removes the broken section from the rest of the plumbing line.


Step 7: Replacing The Pipe
Leak Locators replaces the area of pipe that was broken and measures and cuts the desired amount of replacement pipe. Also, that pipe is secured into the section of plumbing that was removed.
Step 8: Retesting The Pipe
Leak Locators pressurizes the line to determine that the repair has stopped the leak. Also, in the event of a secondary break in the line Leak Locators begins the leak detection process over to determine the position of that leak.


Step 9: Reconnecting The Equipment Pad
Leak Locators returns the equipment pad back to operating specifications. Leak Locators repairs any lines that may have been cut in order to perform the necessary tests during the leak detection.
Step 10: Back-Fill
Once the pipe has been repaired and proven to hold pressure Leak Locators back-fills the hole where the repair was made. The original dirt that was taken out in Step 5 will be used to fill the hole back in and secure the pipe in place.

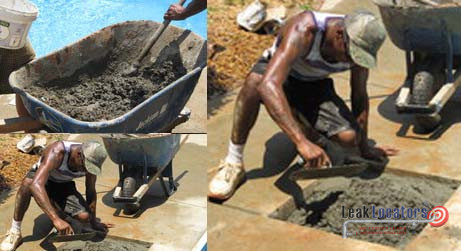
Step 11: Adding Concrete
Leak Locators replaces the removed concrete from Step 4 with new materials. Recommendations will be made to the customer for additional support in returning the deck back to its original look.
Also, these services (and more) are available by Leak Locators.
Call Leak Locators today at (919) 376-9203 or fill out the contact form here.
Lastly, to read more and view pictures about the processes of leak detection by Leak Locators, click here.